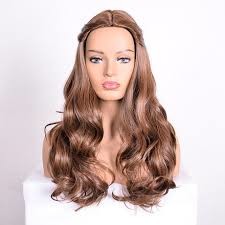
Different type of wigs that can be created
Have you ever heard of a lace front wig or partial piece? It’s pretty common to see your favorite fashionista rocking a lace front or capturing your celebs in a partial piece. Society is more accepting of wigs. Why? People understand that women want to be able to feel confident and beautiful in their skin. Whether that means adding a few inches to your hair or snatching your waist, we are here for all of it. The best thing about choosing a wig today is that we have a variety of options to choose from today.
Here the different variations of a wig:
Lace front
Lace front wigs cover essentially the forefront of the head. They have the lace only in the front of the unit. The remainder of your head is covered in a thicker cap. The cap may have clips sewn to it to help hold the wig onto the head.
Human hair
It’s just as the name implies. Human hair can be used to make a wig. The hair can be transported from anywhere in the world and usually sold at a higher quality than in stores.
Synthetic hair
Synthetic hair is usually more commonly available in beauty supply stores across the country. At a reasonable price and poor quality, it’s a simple go-to source for testing out if you’re comfortable with wigs.
Monofiliment
If you have a sensitive scalp then the best option is to go with a monofilament wig. Monofilament materials take on the color of the person scalp when worn. The benefit is that no matter where you part your hair, it looks like the hair is coming out of your own hair follicles.
Full Lace
If you’re looking for a look that will cover your entire head, then the full lace wig is your best choice. Made with 100 % human hair a safely constructed cap will give you the layers and flexibility you’ve been craving with your hair.

What is required to make a wig?
Now that you are comfortable with the different types of wigs on the market. Are you ready to make your own? We hope so. With these helpful tips and easy to complete steps making a wig will make you feel confident. Although wigs may vary in style and construction, this article is just a resource to help you get your feet wet. Do your homework for other viable methods for constructing a wig.
You will need the following:
- Wig head (mannequin head)
- Hair (Sew-in Extensions)
- Wig Stand or Tape
- Needle & Thread, Hair Glue & Blow Dryer or Hot Glue gun & Sticks
- Adjustable Dome Wig Cap
- Wig Combs
- Wig band
- Scissors
- Lace Frontal glue (optional)
You can purchase many of these tools at your local beauty supply store. Depending on the type of wig you chose to make you may need to buy lace frontal glue to secure the hairline of your wig down.
Step by step process of creating a wig
Step 1 – Wig Head
Mount your wig head on a wig stand or set it down on a chair or table with tape.
Tip: It’s important to stabilize your wig while constructing. It makes the process much easier to complete.
Step 2 – Prepare Hair Extensions
Measure and cut your extensions to fit the circumference of the wig cap while securing them down from back to front.
While you’re working your way through creating the wig you want to start laying the tracks down in a more U-shape pattern. This unique pattern will help you to attach the threading to the cap. You want to make sure that your hair extensions are in a secure place as you go along. One way to ensure that is with your supplies by using needle & thread, hair glue & blow dryer or hot glue gun & glue sticks.
Tip: Needle and thread is the most secure method yet takes the longest to install. Hair glue and hot glue are both fast, yet hot glue is a bit more durable yet must be done with caution because the glue is hot.
Step 3 – Closure or Frontal?
It’s decision-making time. Are you going with a closure or frontal? If you are creating a wig with a closure or a frontal you should lay that piece down first and then add the remaining extensions. This will help you see how much hair you need and allow you to make the best decision possible.
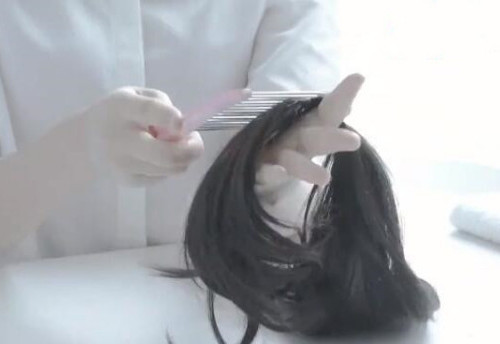
Step 4 – Track
Carefully cover the hair cap with track extensions. The most crucial part of the process is how you are placing the tracks on the cap. Keep in mind the style you are going for in the result.
Step 5 – Wig Band
Most beauty professionals prefer a wig band for extra security of the hair. Add a wig band and wig combs. This will be beneficial when you are wearing your wig.
Tip: Remove any lace if you are creating a frontal wig.
Step 6 – Style
After completing your full wig, you can decide how you want to style your new look. Here are a few suggestions: cut the front of your wig into blunt bangs or consider a side part for a few suggestions.
How to properly care for the wig after creating
Now, it’s time to get your hands dirty and your hair clean. Although wigs are a girl’s best friend for date night or the red carpet. We want to make sure that you’re taking good care of your bestie. Here are a few tips and suggestions for maintaining the health and appearance of your wig:
- Avoid too much heat: Hold the curling iron! Putting too much heat on your hair will destroy the cuticles and cause irreversible damage to the ends. That also includes storing the wig in a safe place inside your home. Depending on the type of hair you’re using it could be flammable. Our best advice is to not expose your hair to heat too often which includes hair dryers or sun.
- Use a Spray Bottle with Luke Warm Water to Wash it: Wash day for your wig is a little different than it normally is for you. Since the wig is attached to the mannequin head. We recommend adding a tablespoon of shampoo to a small spray bottle and filling it with lukewarm water. Distribute the shampoo throughout the wig and use a wide-tooth comb to work through your hair. After the shampoo is evenly dispersed through your wig, it’s time to rinse it. Rinse your hair under the cool water and get ready to apply conditioner to the wig next. Now it’s time to add a tablespoon of conditioner to a new spray bottle or you can rinse out the shampoo out of the spray bottle and use that instead if that’s easier. In the same way, you worked through your wig with the shampoo, you’ll need to do this with the conditioner. Use a towel and gently dry the hair, and afterward, you’ll want to let it dry naturally after you’ve gotten most of the water out. Don’t rub the hair strands against one another – pat dry the hair to prevent any hair breakage from happening.
- Be gentle: Although we sometimes treat our besties like they will last for a long time. The truth is they will last for as long as we treat them well. Be gentle with your wig when combing it. Even though the hair is pretty secure in the lace base, it’s still important to be cautious. In order to prevent any hair from getting loose, you’ll want to start brushing the hair from the ends to the top, without getting too close to the lace base.
Are you excited about making your first wig? We sincerely hope so. Don’t be afraid to be bold and fearless in your style selections. Your hair is an extension of your awesome personality and strength. Show it! Feel free to share with us your results and tell us how this article was helpful. Take care of yourself and your beautiful bestie adorning your head.